Artwork Guidelines
Sending your Print-ready Files
We accept all files electronically uploaded online. However you can also email files to Print@quillsuk.co.uk up to 10mb .
For larger files, we recommend using online file transfer platform such as ‘WeTransfer’ or ‘MailBigFile’ to send them to Print@quillsuk.co.uk (The transfer completion time depends on the speed of your internet connection and the file size).
File Formats
PDF’s are the best format for you to provide your artwork, please make sure your images are at least 300dpi and all colours are correct.
If your artwork is created in any of the following software packages:
- Adobe InDesign
- Adobe Illustrator
- Adobe Photoshop
- QuarkXpress
- Please be aware that files from the Microsoft Office suite of programs (Word, PowerPoint, Excel and Publisher) are not designed for commercial printing.
Paper Size
Please set up the page size of your document at the exact size that you wish your job to print. Do not supply artwork floating on a larger page or include multiple items on the same page.
Fonts
When supplying a PDF file, all the fonts should be embedded and only correctly licensed fonts should be used.
Bleed & Crop Marks
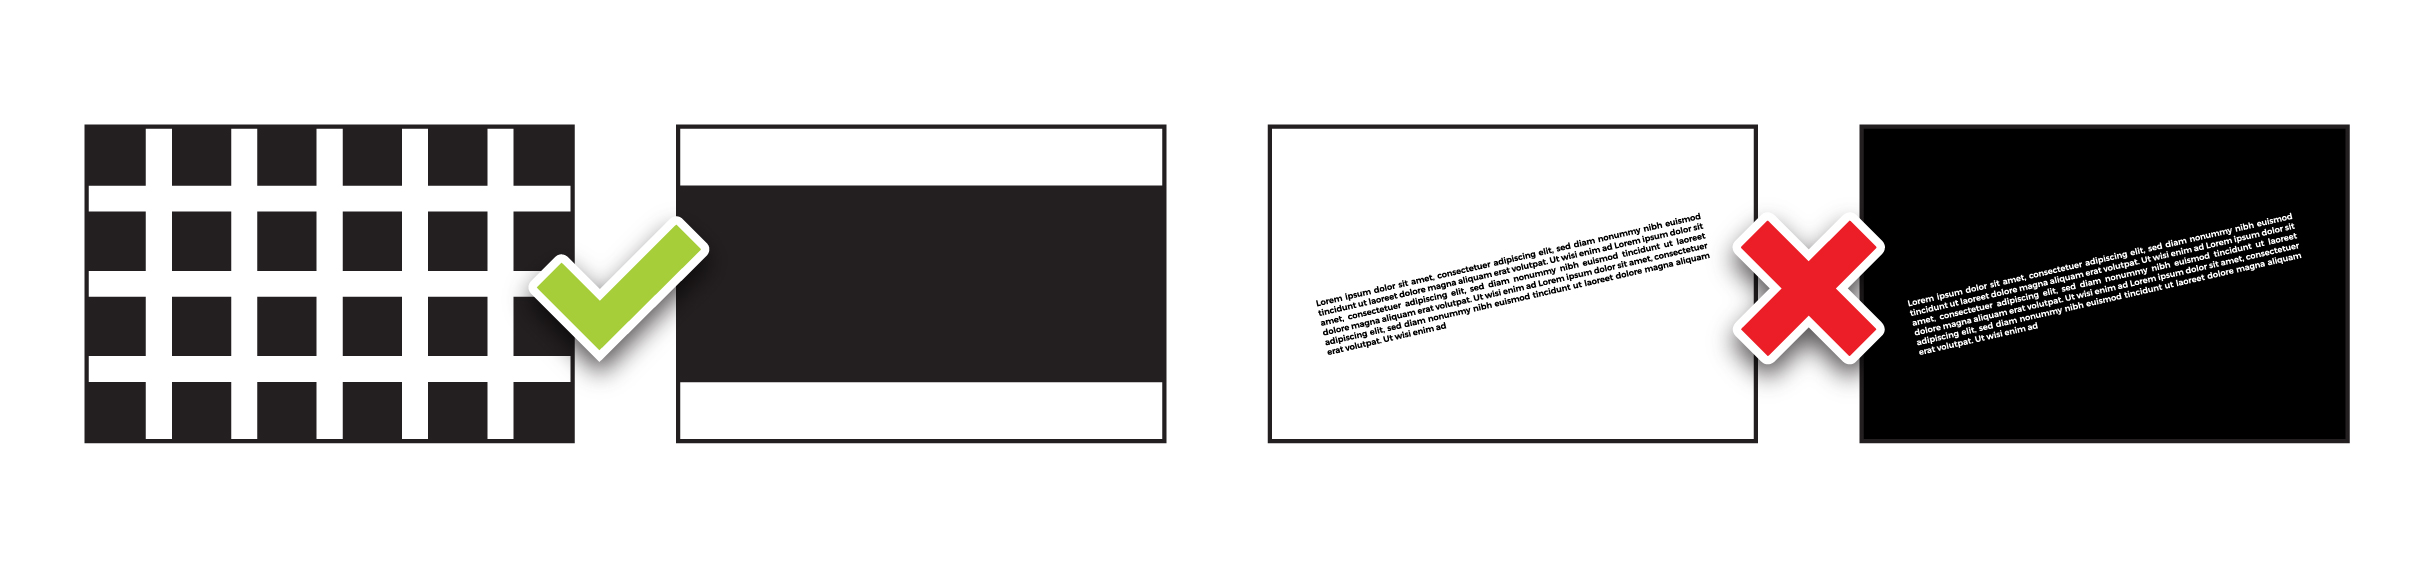
Bleed: If your design includes colour or images which are printed up to the edge of the page, please provide 3mm of additional artwork to all sides. This is called bleed. Bleed avoids the risk of white edges on your work.
Crop Marks: Show us the edge of your work so we know exactly where to trim it.
Colours
Process Colours are referred to as CMYK, Cyan (C), Magenta (M), Yellow (Y) and Black (K), four colour process or even just process. These different colours are used to reproduce a colour image. Combined together in varying proportions CMYK produces the full colour spectrum.
Pantone colours are often specified for printing as a ‘spot colour’, a specific colour printed using an ink made exclusively and typically for jobs which require no full colour imagery like colour matching for corporate branding to ensure consistent colour reproduction.
- Pantone spot colours that are intended to be four colour process and litho printed should be converted to CMYK using the Pantone+ Color Bridge® library. This is not necessary for digital printing as our digital presses create a colour simulation for spot colours.
- Convert all RGB colours to CMYK as colour separations for printing cannot be made from RGB files.
- If your job is full colour, please ensure that you work entirely in CMYK. If your program does not support CMYK or Pantone, we will need to convert your colours before printing.
- Please bear in mind that monitors and desktop printers do not produce accurate representations of the press printed colour.
Scans & Images
All scans and images included in your artwork file should be supplied at least 300dpi in the correct colour mode at the placed size.
Images and logos saved from websites are mostly between 72-96dpi and are therefore unsuitable for printing. If you upscale or add resolutions to images in your image editing software, this will not increase the quality of the image and may result in blurry or bit-mapped images. For example, a 300dpi image scaled to 400% when placed is only 75dpi!
We recommend using professional images as low quality images can only downgrade your design. There are many companies supplying stock image galleries online for example, Shutterstock or Getty Images.
Creating a Print-ready PDF
To prepare your files for print, for the best results we prefer to receive artwork as a press ready PDF.
- All PDFs should be set to high resolution to be press ready
- All PDFs must include 3mm bleed and crop marks
- All fonts must be embedded within Adobe Acrobat: the ‘File > Properties > Fonts’ tab shows a full list of fonts used in the document. Every font should show as embedded or an embedded subset
- Any process colours are converted to CMYK prior to creating a PDF. Converting spot colours to CMYK after creating a PDF may produce unexpected results (especially when transparent effects are involved)
- We recommend using the PDF/X-3 standard
- We recommend checking a PDF using the Output Preview prior to sending us your file. This can show overprinting and will list all the separations included
Preparing your Spot UV Artwork
Spot UV
Spot UV is an area of Ultra Violet gloss coating that creates a glossy finish to targeted areas of your print job. This works well on larger areas and as a pattern on a flat background, and it is not recommended for small text or thin lines.
Supplying your files
When supplying files for artwork containing Spot UV, you must supply artwork for the spot UV itself as well as your artwork. The spot UV artwork should consist of solid black shapes (100% K only, no cyan, magenta or yellow) in the exact position on the page where the spot UV is required, ideally in vector as opposed to bitmap formula. The Spot UV artwork should be on a separate page but have the same dimensions and crop marks in the same position as the design artwork.
Please note, Spot UV is applied using a process similar to screen printing, and has registration tolerances of approximately ±0.5 mm and is therefore not recommended for small text or thin lines.
Spot UV Business Cards
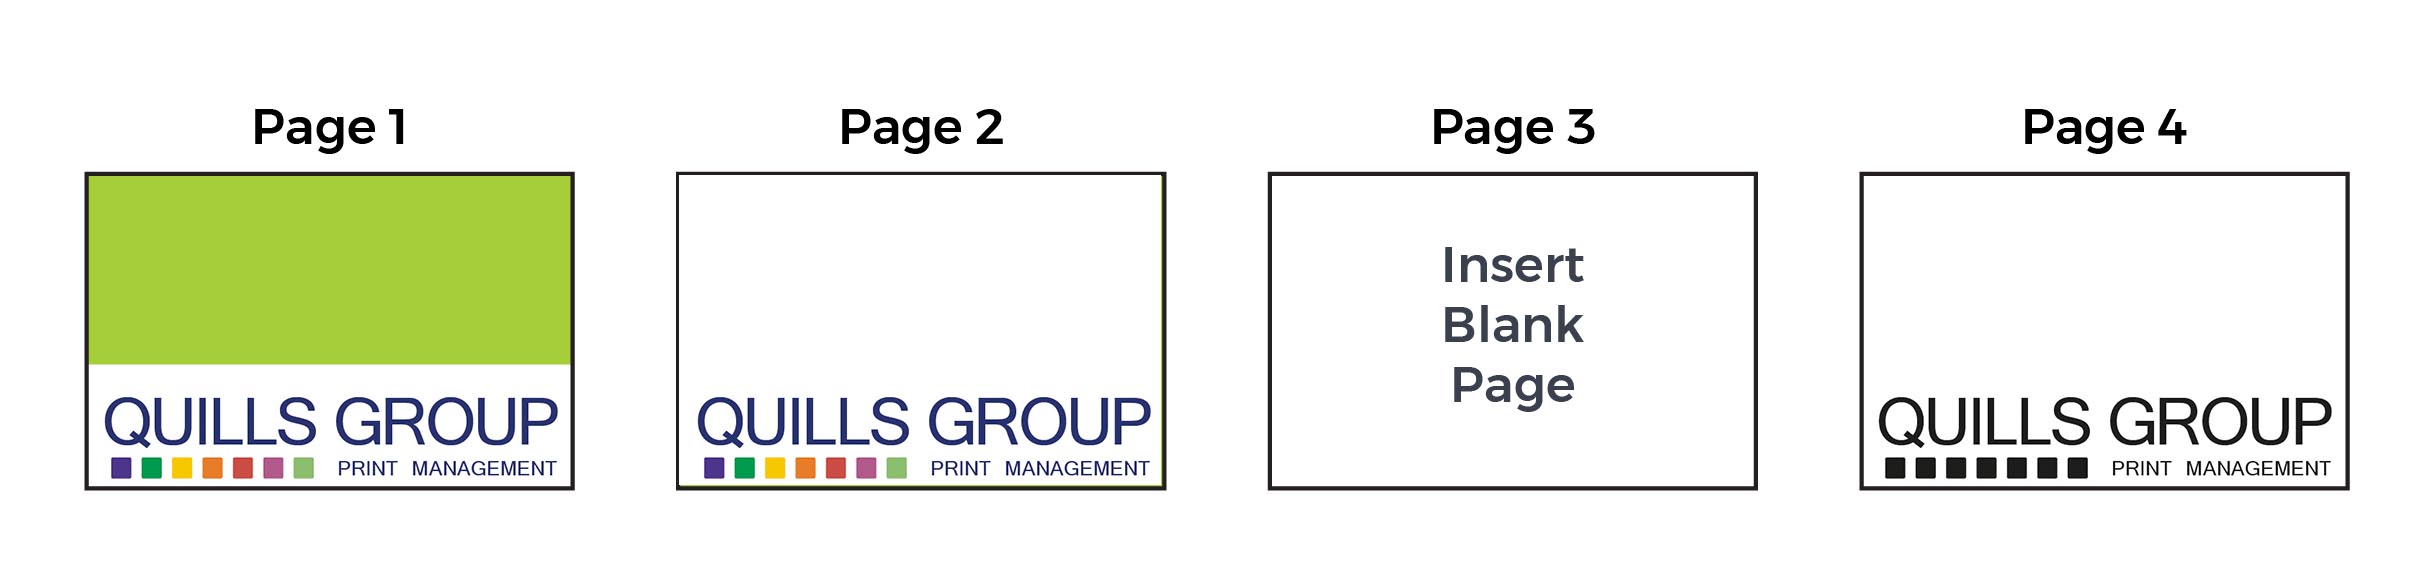
Please supply as 1 print-ready PDF file, containing 4 pages, as follows:
Page 1: Artwork Front
Page 2: Artwork Back
Page 3: Spot UV Front
Page 4: Spot UV Back
Single Sided Spot UV
For a single-sided Spot UV Business Card, please supply a 2-page PDF file, page 1 being the artwork and page 2 being the spot UV artwork.
If you would like single sided UV but a double-sided print, the order still needs to be placed as a double-sided business card and we require a 4 page file. Follow these instructions:
- If you have a page that doesn’t require either artwork or Spot UV, please insert a blank page so you always supply 4 pages in the correct order.
- To insert a blank page into your print-ready PDF, firstly create a blank PDF that is 85 x 55mm
Combine your files using Acrobat’s Combine PDF function, or alternatively, insert the blank page into the PDF by using Acrobat’s Insert Page function.
How to prepare your Flag artwork files
Once you have placed your order you can upload your print ready artwork.
Please ensure your files have the following:
- 300dpi resolution
- Supplied at a scale of 25%
- 3mm bleed on all sides
- CMYK PDF
- Outlined or embedded fonts
Please download the relevant template and use this as a guide when designing your artwork.
When submitting artwork, please send us two files: one with the artwork template visible and overlaid on your artwork, and another with the template removed, displaying only your artwork. We use the first document to check your files are accurate, and we will proof and print the second document.
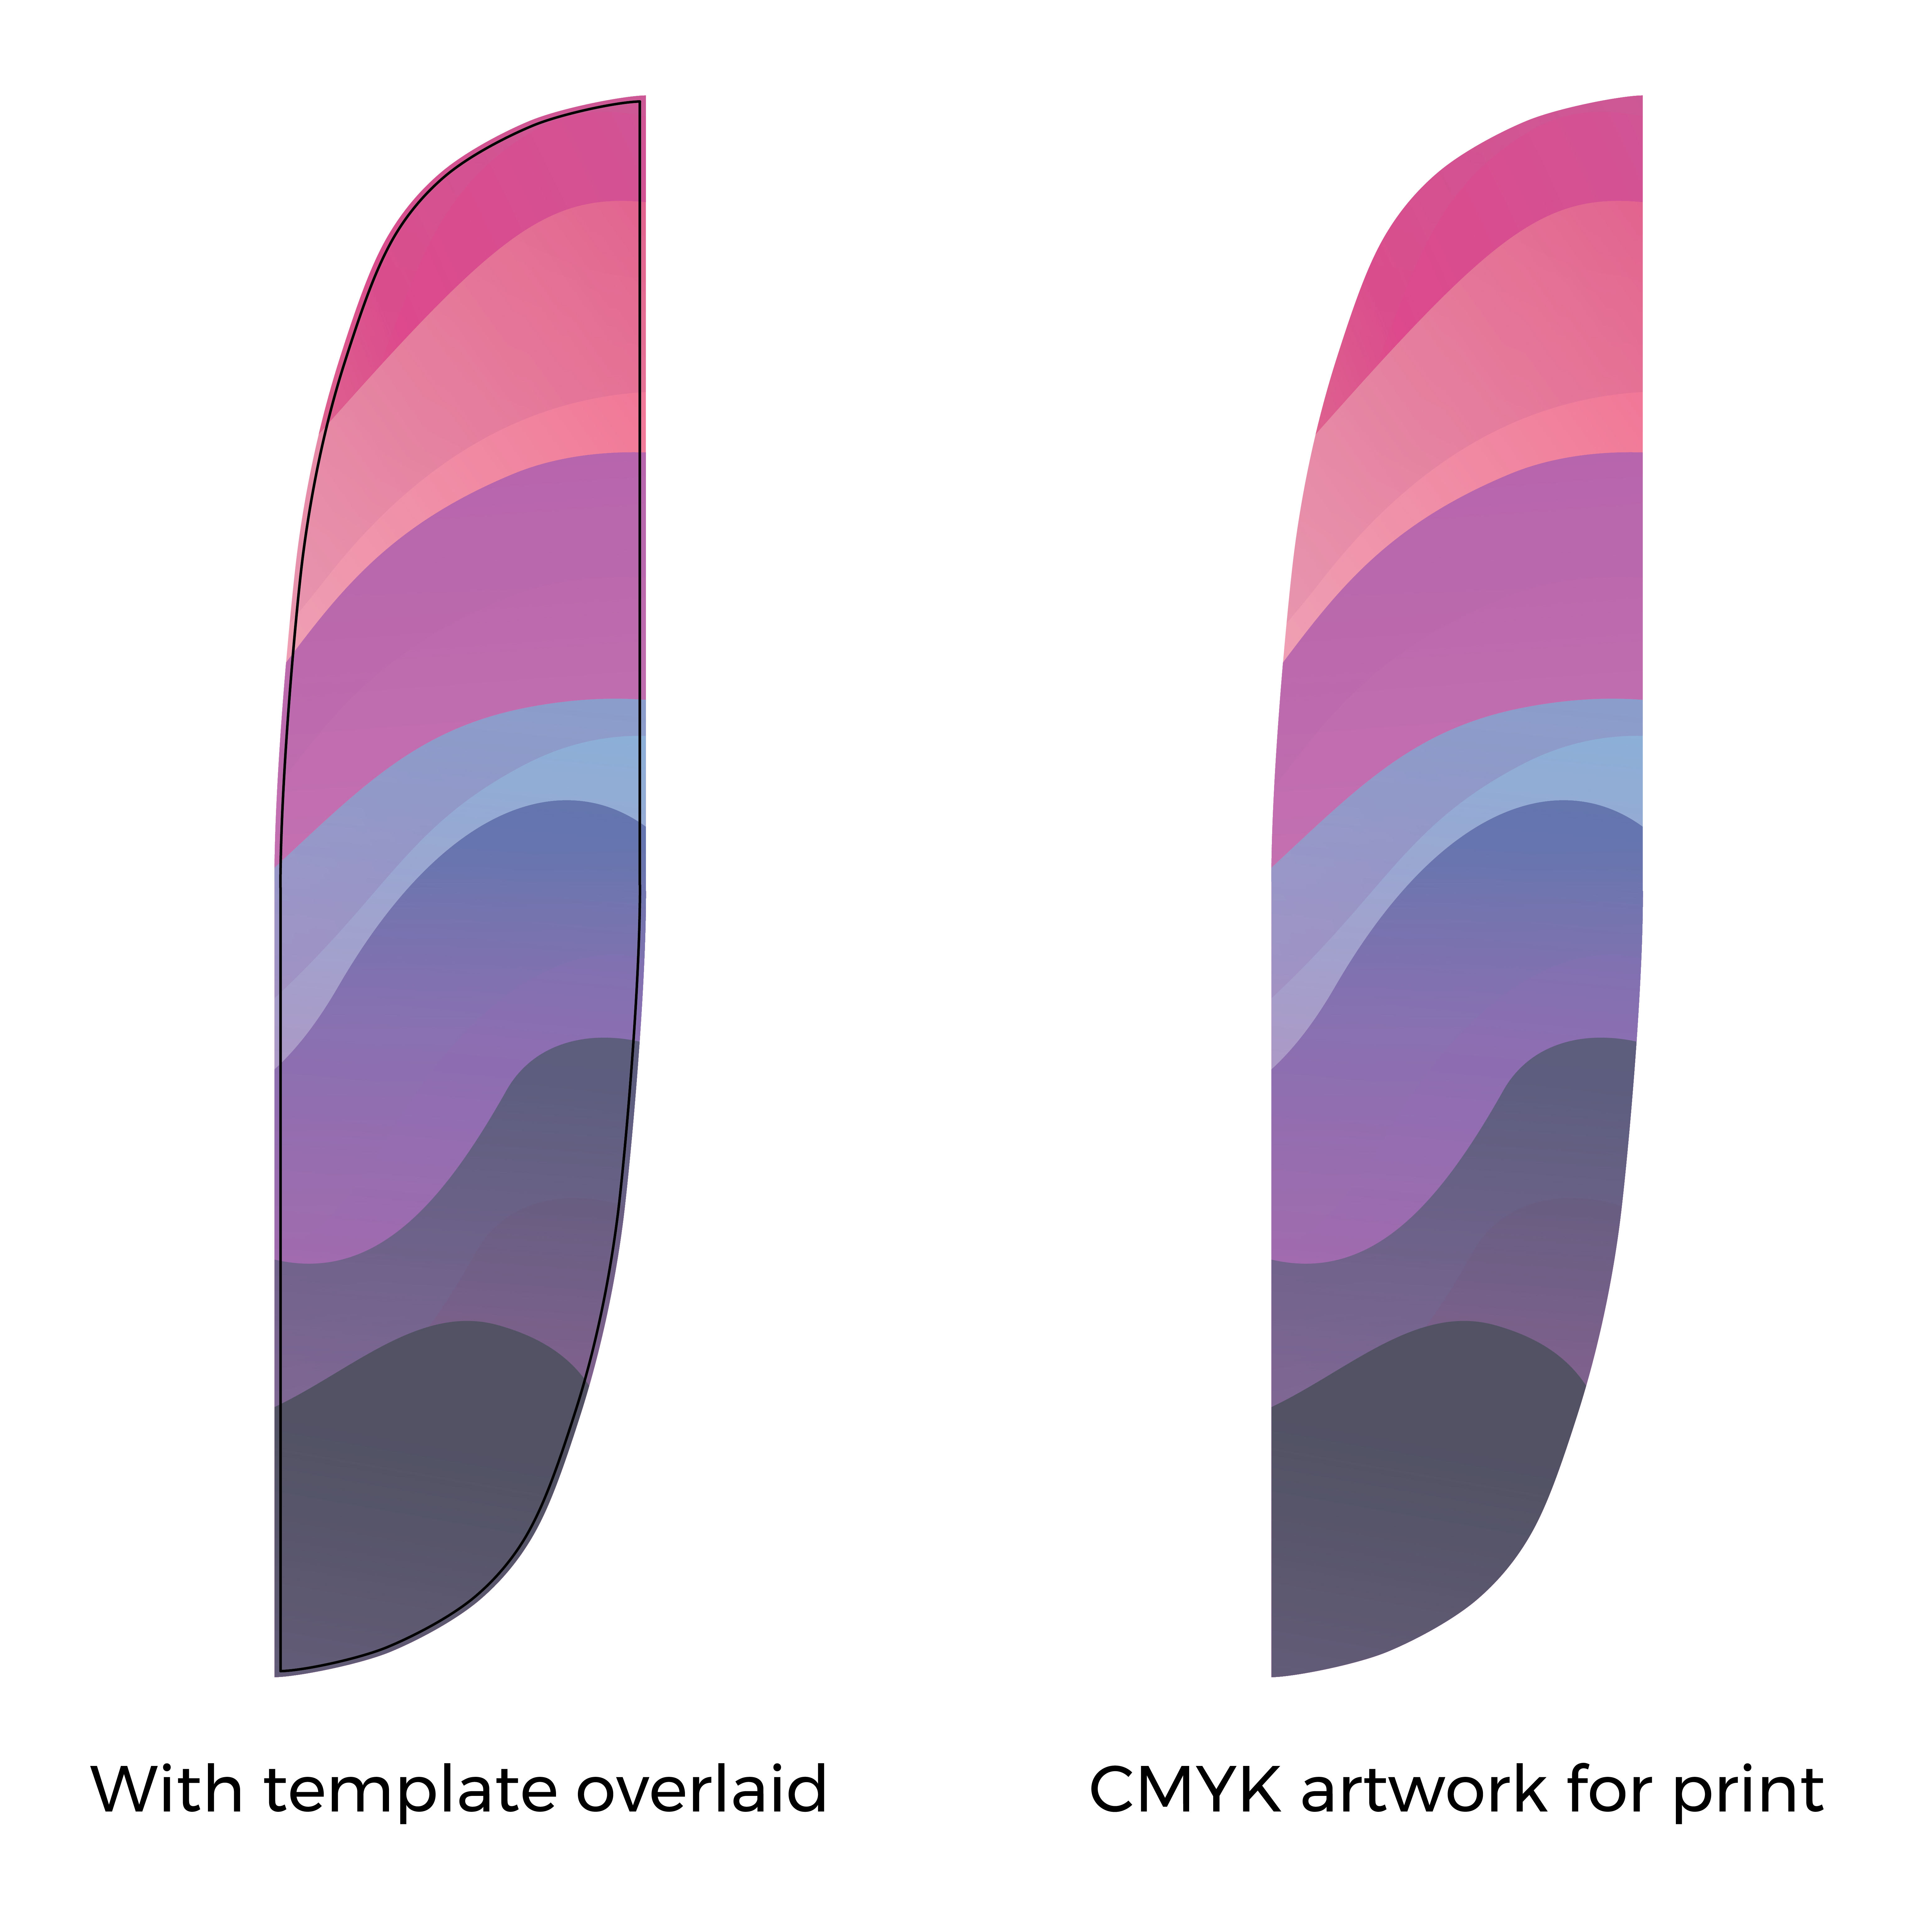
Download artwork templates from the product page.